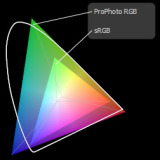
Color Management: Wide Gamut Displays in a CG Workflow
Everything you always wanted to know about color management but were afraid to ask.
I’ve recently done some extensive research about color management, ICC profiling, “mysterious” color changes when leaving Photoshop and how it applies to a 3D workflow, as well as photo or film workflows…
Modo 401 is Here! Yey!
I just wanted to share my joy, modo 401 was released today. Woohoo! I’m downloading my update as I type and am very excited to take this new baby for a spin. Thank god that Luxology utilizes BitTorrent for a release like this, otherwise I guess the download would take forever… To be honest, I…
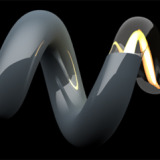
The Skopa Chair for Magasinet Filter
It’s been kinda quiet in my journal for a while – as I’ve been very busy with some long term projects. I’m really looking forward to when I’ll be able to start publishing content from them. Anyway, to break the silence, as I do a few smaller gigs now and then, here’s a 3D illustration…

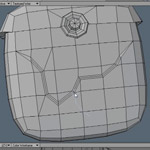
LightWave 3D Video Tutorial – Using TrueArt’s EasySplit
A few days ago I got a question in relation to the article I posted some months back, tips to speed up the modeling workflow in LightWave, concerning the TrueArt’s plugins that I use. How I actually incorporate them in my workflow. So I thought it would be a nice idea to make a video…
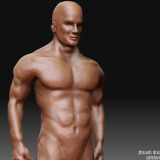
Male Sculpt – ZBrush Doodling
Just another quick sculpting doodle… I had some time to kill today while waiting for renders to finish, and it has been some time since I had a doodle session, so I sketched around in ZBrush for a while and created this character. Nothing special, I just wanted to brush up a bit on male…
Elly Has Left the Building, Final Render and Breakdown
Alright, it was time to wrap this baby up. I could go on and on to keep detailing and refining her, but I felt I’d reached the point where I’d accomplished what I wanted with this project, mainly researching some new techniques for my workflow and touch some base with FiberFX in 9.6. The final…

Fifth and Final WIP of Elly
Here’s another update of this CG model, I spent some time with her last night. I modeled a new earpiece for her, fixed the clothing to make them a bit more fitting for her and also did some final tweaks to the skin texture and shading, which I am pretty happy with now. But the…

Get Ready – More LightWave Excitement, NewTek Core
LightWave 9.6 has barely left the building (released just 2 days ago), when NewTek drops the next bomb. The excitement builds up at NewTek Core. Guess we’ll soon know more about the next major leap for LightWave. They sure are busy bees over at NewTek these days, and it has never been more interesting and…
Fourth WIP of the Elly Model
Here’s a quick update to the character I worked with last week. I have been really busy, with work and also updating artstorm.net with some improved design and new features (like the turntable function), so I haven’t had time to pick her up for work again until yesterday, where I got some more things done…

It’s Here, LightWave 3D 9.6
LightWave 3D 9.6… Woohoo! I just wanted to add a shout out that version 9.6 has been released today and are available to download at NewTek. I’m so happy with this release, as about every quirk I had with 9.5 is gone. Actually there is over 600 fixes and feature requests implemented in 9.6. It’s…