Turntable – Give the Model a Spin
I love turntables, I think they are an excellent way to display a model. I got inspired of what Pixologic did with their ZBrush turntable gallery, so I dusted of my old flash knowledge and implemented a turntable function, as I was anyway doing some fine tuning to the site design. If you want to…

Skin and Hair Updates on Elly + Bonus FiberFX Script
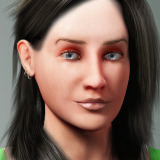
I had some time tonight to make a few small updates to Elly. It’s getting closer to completion. Here’s the latest render test, the hair definitely needs more work… I didn’t have so much time to work with this tonight, but since yesterday I have done a few things anyway. I cleaned up some more…
Resurrected Female Model – Painted and Shaded
Okay, a few hours has passed since my earlier post and it’s time for me to call it a night. Naturally I couldn’t completely finish her in this amount of time, as it’s quite a tedious task creating a detailed CG character. But I came pretty far though. I more or less completed painting the…

Resurrecting Old Projects – Female Model
It’s Sunday afternoon, all the dreadful holidays stealing precious time are coming to an end, so what’s better to start of 2009 than by doing some house cleaning. I’ve let the axe work it’s way through my folder of unfinished projects with no mercy. It was time to kill some darlings where just too much…

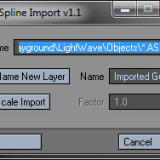
Hair Guides Styling – ASE Spline Importer for LightWave 3D
LightWave 3D has some excellent rendering options for hair. We have the native FiberFX as well as the Sasquatch plugin from Worley Labs. Unfortunately the actual creation and styling of hair guides is still a bit cumbersome in LightWave, which is a shame really as the quality of the renders can be of outstanding quality….
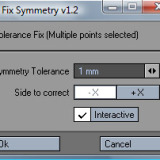
Fix Symmetry Plugin for LightWave 3D
Fix Symmetry is a LightWave 3D modeler script I wrote for my own personal use some time ago. I recently polished it a bit by giving it a decent GUI and some more options, so I could release it. I hope some of you might find the tool useful in your workflow. It’s a more…
Artstorm Reloaded, Please Update Your Feed URL
I have wanted to change a great deal of things on my website for quite some time, but it’s always a bigger project than one anticipates to make major changes, so it’s been on my list of things to do when I have some time to spare. This weekend I finally put aside that time…
Speed Doodling Session – Male Bust
Alright, time to post another speed doodle, I’ll keep these babies coming until I’m completely satisfied with my speed vs quality before moving on to make complete character projects with the new techniques I am developing for myself. This is approximately a 4 hour sculpt from the first drawn ZSphere in ZBrush until the final…

LightWave 3D – A Great Speed Modeling Application
About a year ago, I wrote a post about customizing modeler, since then I’ve completely switched to a 64-bit environment and with LightWave 9.5 just released, it was about time for an updated version. LightWave 3D was once known as the fastest polygon and subdivision modeler on the market. The modeling workflow was considered one…

LightWave 3D 10 – Top Ten Wish List
LightWave 3D 9.5 was just released. An excellent update to the current LightWave cycle, which I am extremely pleased with. With the promised hotfix/service release (9.5.1 maybe?), that should arrive shortly, fixing the minor things that didn’t make it to the Siggraph release (which I hope includes fixes for the FBX bone export and OBJ…